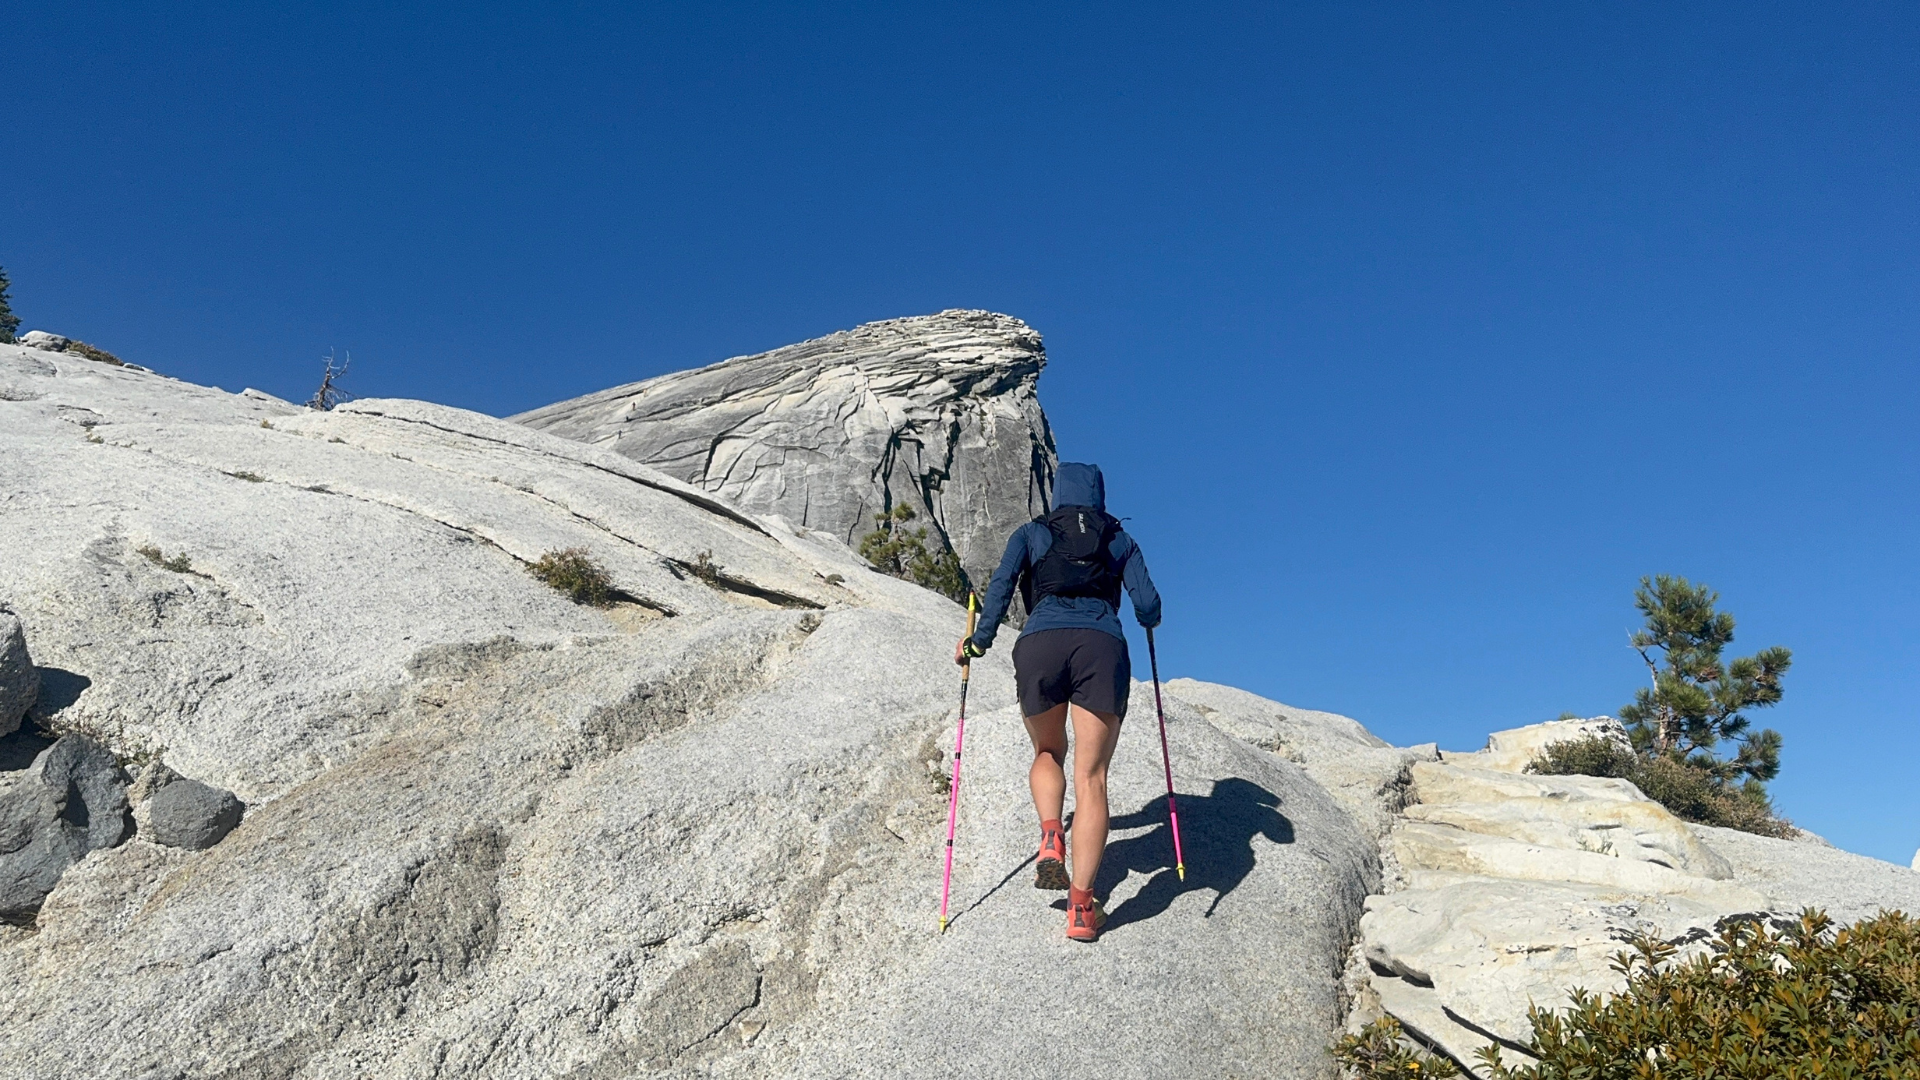
No access to trails? No problem. Here is how to build trail-ready fitness from anywhere.
A common myth repeated in online fitness communities is that you don't need to train for hiking or backpacking. Maybe, if you live in a mountain town with endless trails at different altitudes, you can get away with minimal prep. But even then, structured strength training across different planes of motion will enhance your performance and significantly reduce injury risk.
But what if you don't have easy access to trails? What if your schedule doesn't allow for weekly escapes into nature? And perhaps the most common challenge: what if you live in the flatlands but are training for a mountainous adventure?
These are real concerns that outdoor enthusiasts face all over the world. The fear of showing up underprepared for a once-in-a-lifetime trek can cause real stress and doubt. It doesn't have to.
No matter where you live or what terrain you have access to, you can train effectively for elevation gain, long endurance days, and steep descents. This guide breaks down practical, accessible strategies to build cardiovascular efficiency, power through climbs, and develop downhill resilience.
→ Free Download
17-Page Training Guide
No Mountains? No Problem.
Most people training for mountain objectives don't live near mountains. This free guide gives you structured treadmill and StairMaster workouts built specifically for hikers and backpackers training at low elevation.
Incline treadmill workouts with exact settings
StairMaster protocols for vertical gain
Heart rate zone guidance for every session
17 pages of structured training, completely free
Prefer to Watch?
CardiovascularEfficiency
Cardiovascular training is a complex topic. Rather than diving into the physiology of specific adaptations, this section focuses on practical strategies you can start using today. One key advantage mountain town hikers have is the frequency with which they activate their aerobic system.
Frequency refers not just to how often you train each week, but also to the duration of each session. Research consistently shows that building a strong aerobic base requires consistent, low-intensity efforts over time. The more time you spend moving at a slow, sustainable pace, the longer you will be able to keep going.
There is no shortcut to building endurance. Developing it takes time on your feet, week after week, gradually increasing both how often and how long you engage in aerobic movement.
Heart Rate Zones Explained
Understanding your heart rate zones is the foundation of smart endurance training. Different zones produce different adaptations, and for hiking, you need to train across all of them.
Zone
% of HR Max
Feel
Hiking Purpose
Zone 1
50–60%
Easy walk, full conversation
Active recovery, warm-up
Zone 2
60–70%
Slightly winded, can talk in sentences
Aerobic base, long days on trail
Zone 3
70–80%
Harder effort, shorter sentences
Sustained climbs, tempo efforts
Zone 4
80–90%
Hard, few words at a time
Steep ascents, altitude prep
Zone 5
90–100%
All out, unsustainable
Short summit pushes, intervals
Your heart rate max can be estimated using 220 minus your age, or more accurately determined through a Heart Rate Drift Test. In practical terms, if you are truly in Zone 2, you should be able to read this article aloud in full sentences, feeling slightly winded by the end of each one but still able to continue.
Aerobic Base: Zone 2
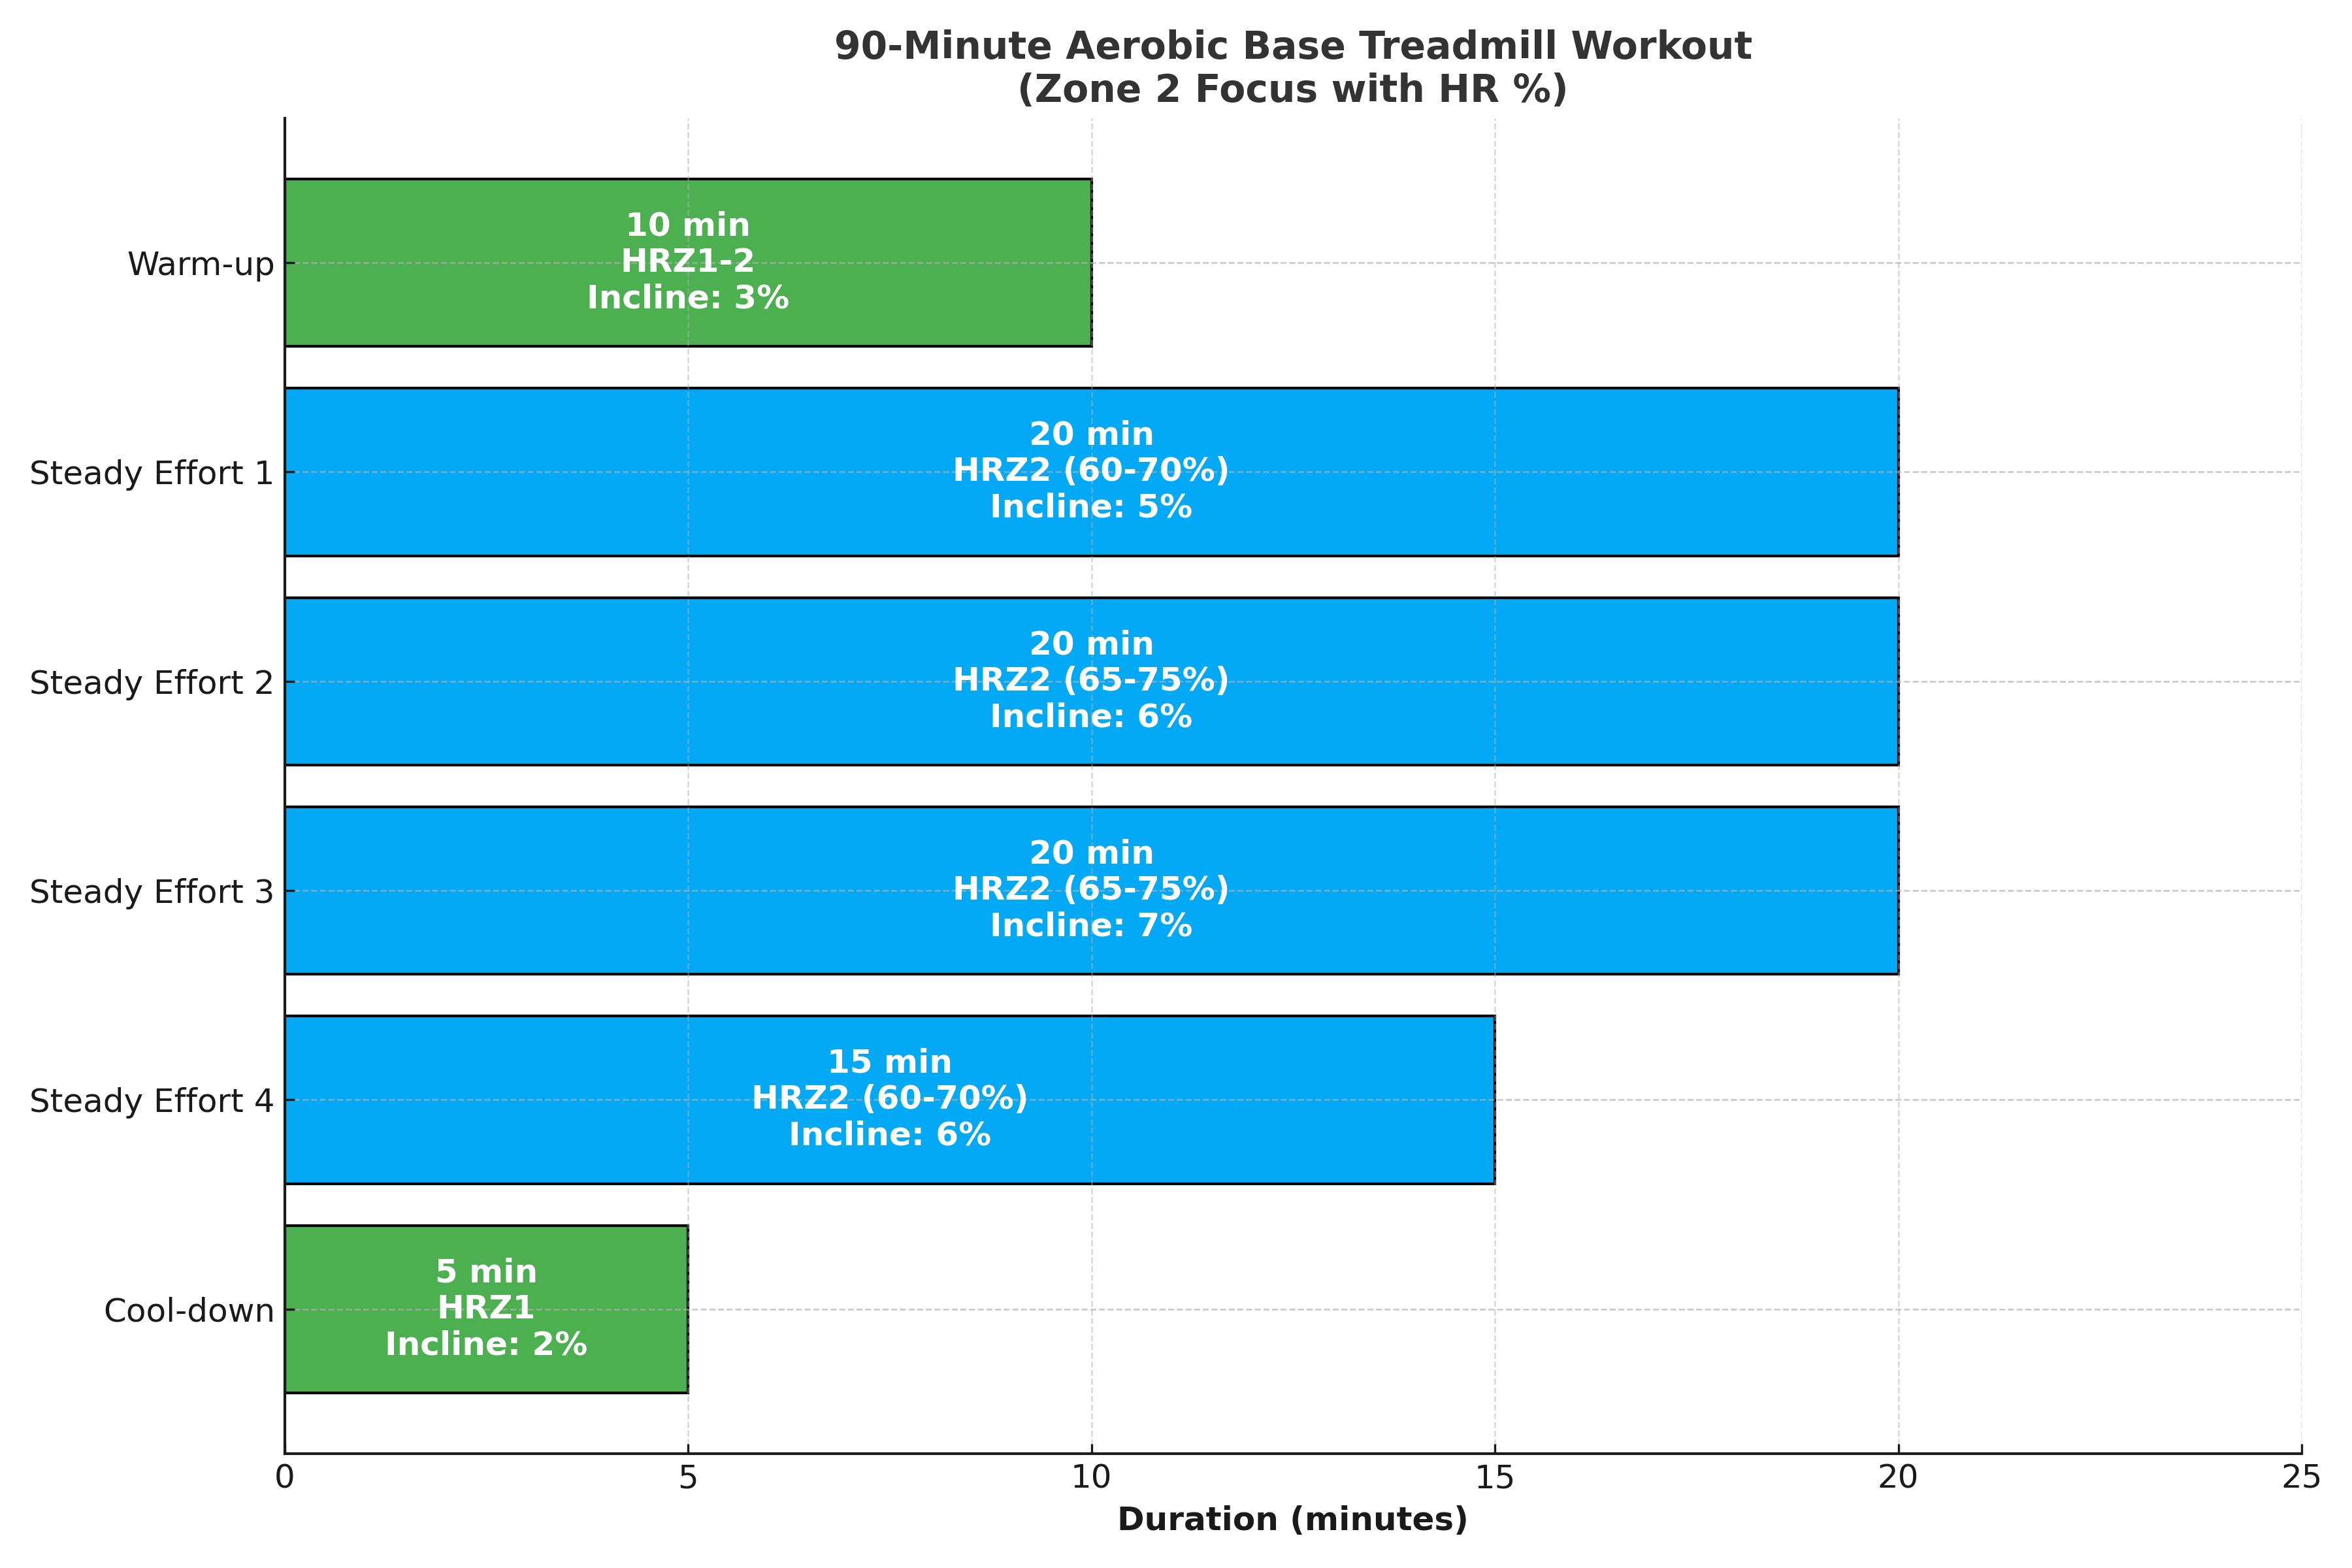
Zone 2 is the sweet spot for developing aerobic endurance. Training in this range stimulates your cells to produce more mitochondria, increasing ATP production and ultimately leading to greater energy efficiency. This is the zone that keeps you moving for 8 hours on a big trail day.
For endurance training, aim for at least 180 minutes of Zone 2 cardio per week. Ideally, this should be done in a sport-specific manner — walking with a pack if you are training for hiking or trekking. In general, 60 to 70% of your total cardio training should be in this zone.
Zone 2 aerobic base workout, ideal for building hiking endurance
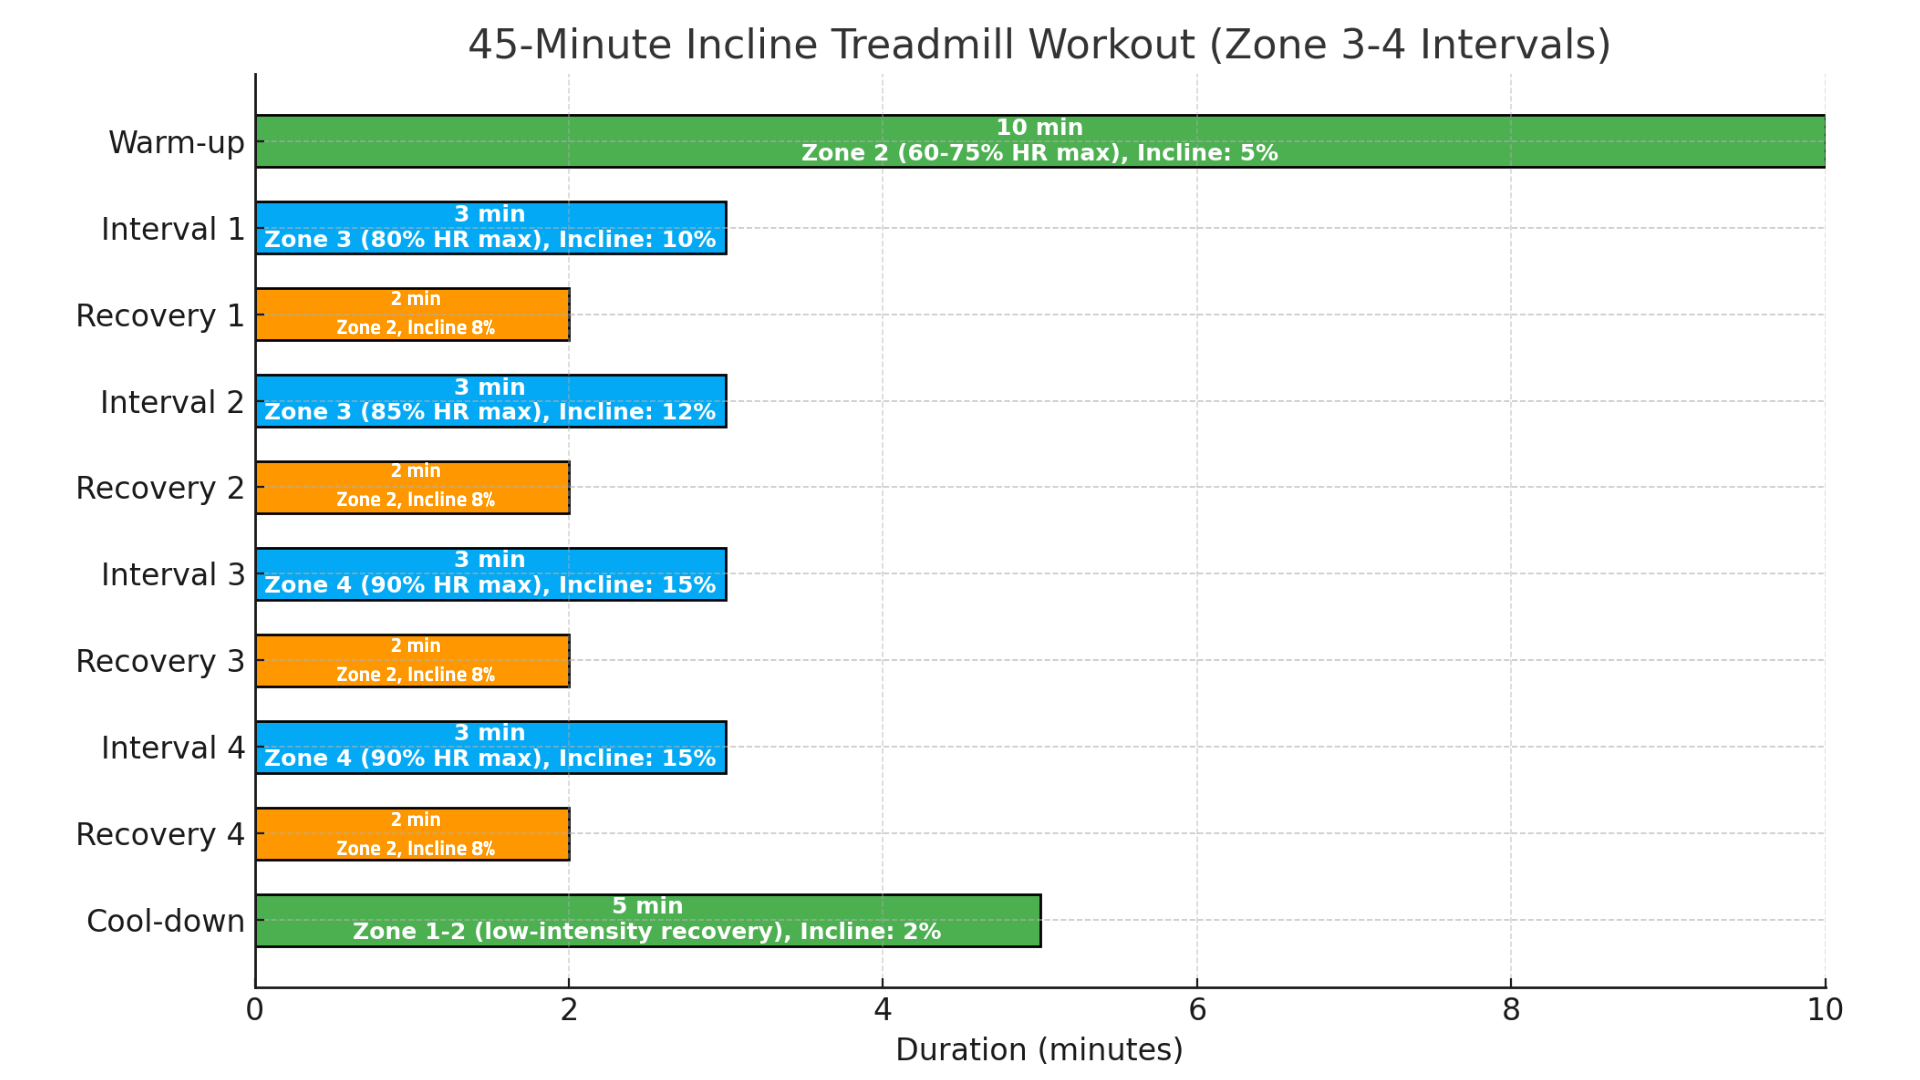
Anaerobic Threshold: Zones 3 and 4
Zone 1 is primarily used for recovery, active circulation, and low-intensity movement. But Zones 3 to 5 are where things get anaerobic. We generally recommend that clients spend 30 to 40% of their total cardio training hours in these zones, particularly in Zones 3 and 4, where you push your anaerobic threshold.
This is especially important for sea-level dwellers preparing for high-altitude treks. Exposure to reduced oxygen levels requires the ability to function efficiently in lower-oxygen conditions, and anaerobic threshold training builds exactly that capacity.
45-Minute Zone 3–4 Interval Workout — Incline Treadmill
No HIIT class will give you the aerobic base adaptation. The only way is time on your feet. Lace up your shoes, start walking, and remember: go slow to go fast.
UphillPerformance
One of the biggest concerns we hear from flatlanders training for high-altitude treks, steep trails, or summit pushes is: How will I make it to the top? With the right approach, you can. It is not just about making it either. You want to enjoy the climb, take in the views, and still have enough gas in the tank for the descent.
Strength Training for the Uphill
Uphill movement relies heavily on specific muscle groups, primarily the glutes and hamstrings, also known as the posterior chain. When walking uphill, the back leg extends fully, engaging these powerhouse muscles to drive you forward. Strengthening them significantly improves balance, endurance, and power for big climbs.
While traditional exercises like squats and deadlifts have their place, we prioritize sport-specific movements that translate directly to the trail. You don't squat your way up a mountain. You use movements like step-ups and lunges to haul yourself (and your loaded pack) to the top.
Power Step Up
Builds posterior chain strength specifically for uphill movement. Drive through the heel, engage the glute fully at the top. Add a weighted pack to simulate trail conditions.
Weighted Walking Lunges
A staple uphill movement pattern. Works the glutes, hamstrings, and hip flexors simultaneously. Control the descent on each rep. This is where the real training happens.
UphillCardio
All the lunges and step-ups in the world won't fully prepare you for the cardiovascular demand of a long, relentless climb. Strength matters, but so does the ability to sustain effort over time. The key is finding ways to replicate continuous uphill movement even without access to real elevation.
Incline Treadmill
The incline treadmill is a great tool for building uphill endurance, offering a controlled way to train without the obstacles of real trails. Most gyms, even local YMCAs, have treadmills with incline settings, making this an accessible option regardless of where you live.
For sustained climbs, a Zone 2 incline treadmill workout builds aerobic endurance, while anaerobic threshold intervals develop power for steeper ascents. Want an added challenge? Load up a backpack starting at 10% of your body weight to better simulate the demands of carrying gear uphill.
When training for steep hikes, treks, or summit attempts, vertical feet per hour is a far more relevant metric than miles per hour. Covering 3 miles on flat terrain is vastly different from gaining 1,500 feet of elevation over the same distance.
Estimated Vertical Gain Per Hour — Incline Treadmill
5% / 2.5 mph
660 ft
8% / 3.0 mph
1,267 ft
10% / 3.0 mph
1,584 ft
12% / 3.0 mph
1,901 ft
15% / 3.5 mph
2,772 ft
15% / 4.0 mph
3,168 ft
StairMaster
The StairMaster is one of the best tools for building uphill endurance, mimicking the relentless climb of a steep trail. Unlike a treadmill, it forces consistent step-ups, making it a powerful way to develop leg strength, cardiovascular fitness, and mental toughness.
To get the most out of it, don't cheat. Avoid leaning on the handrails, as there won't be one on the trail. Focus on good posture, strong hip extension, and controlled steps. For an added challenge, wear a backpack loaded with 10 to 15% of your body weight to better simulate real-world conditions.
Estimated Vertical Gain Per Hour — StairMaster (8-inch step)
30 steps/min
1,200 ft
40 steps/min
1,600 ft
50 steps/min
2,000 ft
60 steps/min
2,400 ft
80 steps/min
3,200 ft
90 steps/min
3,600 ft
If your goal is 1,500 feet of elevation gain per hour, maintaining around 40 to 50 steps per minute will replicate that effort. Track vertical gain per hour, not just time on the machine, to ensure your training aligns with the actual demands of your objective.
Find Some Stairs
The best tool is often the most accessible one. A set of stairs at a high school stadium, university bleachers, an apartment complex, or even at home provides a less controlled environment than a treadmill or StairMaster, making it a more realistic training tool.
You can't lean on a handrail. You have to navigate each step. If you plan to use trekking poles on your trek, stairs are an excellent place to practice pole placement. And the most overlooked benefit: you have to go down. This is where most trail accidents happen and where your muscular system and joints take the biggest hit.
Stadium stairs: underrated, accessible, and highly effective
DownhillEndurance
If you have ever been on a big hike or trek, you know the descent can be just as challenging as the climb, if not more so. You have spent all your energy reaching the top, worked through your water and snacks, and assumed the way down would be a breeze with gravity on your side. That is exactly why it catches people off guard.
3xKnee stress vs flat ground going uphill
10xBody weight force on joints going downhill
#1Most accidents happen on the descent
Strength Training for the Downhill
Building strength in the muscles that control eccentric deceleration is key for handling descents. While the posterior chain (glutes and hamstrings) powers the climb, the anterior chain, specifically the quadriceps, takes over on the way down. The quads are large but fatigue quickly, leading to that jello-leg feeling if they aren't prepared.
Our top pick for strengthening quads for descents? The Reverse Step Up: a slow, controlled movement that loads the knee and fully engages the quad to handle downhill impact. Any exercise that emphasizes deceleration or isometric control will help.
Reverse Step Up
The single best exercise for downhill preparation. Step back slowly and controlled, loading the quad eccentrically. Keep the chest tall, drive the knee forward, and resist the urge to rush the descent.
Single Leg Stability Hop
Builds the reactive stability and landing control needed for uneven terrain and technical descents. Land softly, absorb the impact through the full leg, and pause before the next rep.
Find More Stairs
Strength training alone doesn't fully prepare you for the balance, coordination, and real-world impact of downhill movement. Descending on trails requires your body to react dynamically to uneven terrain, shifting footing, and unpredictable forces. The StairMaster will not train you for descending. Most treadmills only offer a minimal downhill grade.
Stairs are your best flatland tool for downhill prep. Practice controlled stair descents, side-stepping for lateral stability, and adding a weighted pack. The goal is not just strength — it is about developing the control and resilience needed to handle long, steep descents without trashing your legs.
Side-stepping for lateral stability and hip strength
Two steps at a time for added eccentric load
Weighted pack at 10 to 15% of body weight
Trekking pole practice if applicable to your objective
FinalConsiderations
Progress in training, like progress on trail, should be gradual. Your body needs time to adapt to new challenges, so ease into the workload and be mindful of recovery. While these tools are valuable for building strength and endurance, nothing replaces real-world experience. Whenever possible, get outside for actual hikes to test your fitness, evaluate your recovery, and refine your approach.
If you are training for multi-day treks, don't just focus on single-day efforts. Back-to-back hikes or long walks with a pack help build fatigue resistance, ensuring your body can handle consecutive days on the trail. Prioritize mobility, stretching, and proper nutrition. Your strength doesn't come from the hike itself but from how well you bounce back. Finally, experiment with hydration and fueling strategies ahead of time so there are no surprises when you're deep in the backcountry.
Train smart at home. Show up strong on the mountain.
Ready for a Structured Program?
Backpacker's Bootcamp
A 27-week science-based training program built specifically for hikers and backpackers. Progressive phases, follow-along sessions, and 1:1 coach support. Everything you need to show up ready.